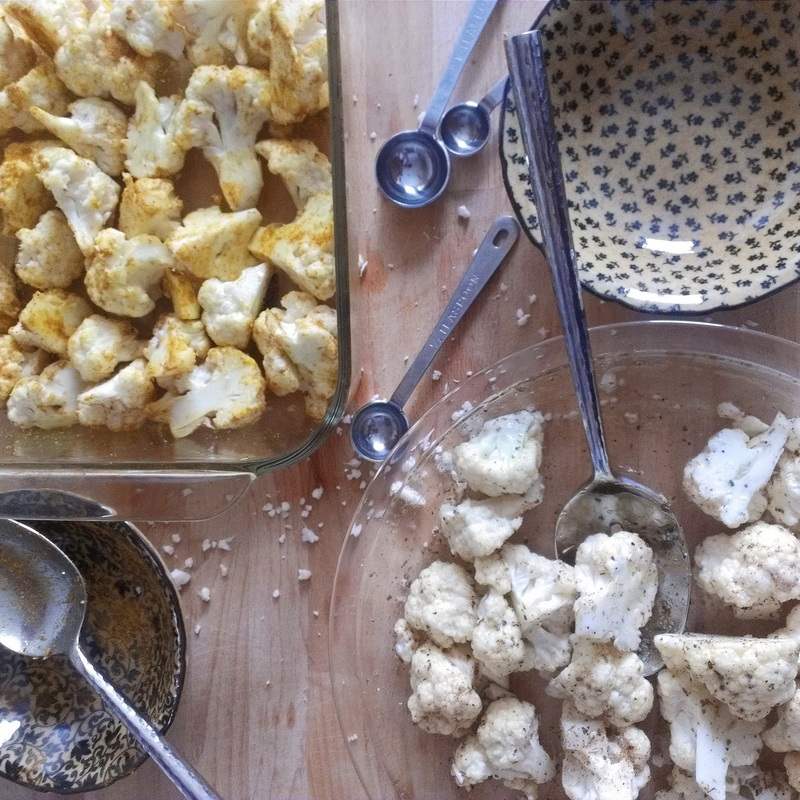
Becoming a student again has been pretty hectic and it has forced me to put the blog on the back burner lately. It has also forced me to get back in the habit of prepping food on the weekend that can be reheated or combined throughout the week. One way to do this is to prep veggies that can be used as a side with a variety of dishes during the week. In the spirit of Fall I recently made two types of roasted cauliflower.
1 Comment
I don’t know about you, but every time I make a recipe that calls for cilantro (salsa, guacamole, fish tacos) I have to buy way more cilantro than the recipe calls for. Which means I end up with a bunch of left over cilantro and every time I tell myself I will find a use for it. Then a few days go by and next thing I know I have a bunch of wilted, decaying cilantro that needs to go in the trash. It’s a disappointing and wasteful cycle.
Back in July, I was making a batch of my fish tacos and of course had leftover cilantro. This time I was determined to break the cycle. No more wasted cilantro. However, I wasn’t sure how to use a large amount of cilantro all at once. As luck would have it the next night, I was out to dinner at a Greek restaurant in DC and one of their entrees used cilantro pesto. It was a meat dish, so I didn’t order it, but it seemed like an interesting idea and a perfect use for extra cilantro. Of course, the next day I had to look online and I quickly realized this was not a new idea and it did not originate with my local Greek restaurant. Apparently, many people had already discovered the joys of cilantro made into pesto. I started tinkering with the recipe myself and came up with a version of cilantro pesto that I really like. It is a fun, fresh take on pesto and my recipe is dairy free making it a great pesto for vegans or those who are dairy intolerant. I love it with salmon and Andrey says it is great with chicken. It also sparks up an egg wrap, makes steamed veggies into an impressive side dish, and works as a salad dressing. Basically, it should be your go to sauce for summer! I started this blog because I was moving to Russia. If you’ve been reading, you know I am back from Russia. Even though that experience is over I want to keep going with this blog.
This blog was begun around the idea of curating my life and this next year is going to take some strategic curating. Andrey and I have just moved back to New York City, so that I can finish my last year at NYU. But while this year is about finishing University, I will still be focused on dance. Balancing those two and my marriage is going to take careful planning. Just as to survive the next year I am going to have to carefully curate my life. I will also have to choose what to cover on this blog. I hope that the new direction that my life is taking will provide for some interesting new topics. The blog will still be focused on its original themes like healthy recipes, my life as a dancer, and striving to live a more sustainable lifestyle while hopefully also exploring new directions. To mark the new phase on the blog I am sharing my first experience making homemade sorbet. Sorbet is both perfect for Summer and as a pallet cleanser. Now this was my first time making sorbet, so I am not going to claim to be an expert. But I did some research and then gave it a try. I recommend this site as a resource for the process. Awhile back I came out of class to find a surprising message on my phone. One of my best friends telling me that she was in DC for the day. This was so surprising because she lived in Ireland at the time and I hadn’t seen her in 2 years! As you can imagine I was very happy and excited at the prospect of meeting up with her. Unfortunately both of our schedules were a bit tight and we could only spend 2 hours catching up on those 2 years. But it didn’t matter because as soon as we sat down it was as if I had seen her a few days ago. We talked about everything and nothing as easily as we did when we saw each other everyday. So, this post is dedicated to friendships that stand the test of time and distance.
In the course of catching up my friend reminded me of the last time we had seen each other. She came to stay with Andrey and I in New York and while she was there we made zucchini bread. She requested that I put my recipe on the blog so that she could make it herself. I wanted to put it up immediately, but then I decided that I needed to tinker with the recipe. So, several batches and many zucchini later, here it is. Enjoy! *This recipe makes a pretty dense bread, so I strongly suggest preparing it as muffins. I also do not recommend baking it on a rainy day as it can have problems rising. These muffins are ideal for breakfast or a healthy snack. Do not expect a supper sweet muffin like one you might find at a coffee shop. Summer has definitely arrived here in DC, which means most days its in the mid-80’s and humid. Given this lovely weather it probably seems strange that I recently decided to make a batch of mushroom risotto. Personally I love risotto, but when I order it at restaurants I often find it an overwhelming dish. The last thing you want to eat on a hot day is something heavy.
This recipe is lighter than your average risotto making it still work for summer. Don’t let the fact that its lighter worry you: it is still full of flavor thanks to the mushrooms. Another trick to making risotto warm weather appropriate is to serve it as a side instead of as the main dish. It goes perfectly with asparagus, which is in season right now and a piece of your favorite white fish. So, go ahead make risotto in the summer, as long as you have air conditioning in your house. It does require standing at the stove for about 40 minutes. One note, risotto takes a lot of its flavor from the broth that it absorbs. Because of this I strongly recommend using homemade vegetable broth rather than store bought. A great trick I learned from my mother is to always cook down the stems or other parts of vegetables that you are not going to cook to serve. Say you are making asparagus, in preparing them you will break off the tough bottoms. Instead of just tossing them you can simmer them in a little water until they release their flavor and nutrients into the water. Once it has cooled just pour it into a Tupperware and freeze it for later. Lately I have been doing some research on the Paleo diet and lifestyle. I try to maintain a healthy lifestyle most of the time and I am always interested in new research and ideas on the subjects of nutrition and diet. Since Paleo seems to be more than a fad, I thought it might be worth learning about. I find the argument that we shouldn’t eat things just because our ancestors didn’t eat them 10,000 years ago less than convincing, but there seems to be another side of Paleo that is routed in science.
I have yet to make up my mind if I am going to try Paleo out, but it has gotten me to explore some paleo-friendly recipes. One of the ideas I came across (after the world famous cauliflower pizza crust) was an alternative piecrust for quiche. Of course the easiest way to cut the carbs from your quiche is to skip the curst, but I always find that leaves me a bit hungry. So, a sweet potato crust is the perfect solution. I will warn you that this recipe does take some time because the sweet potatoes have to be drained of their excess water. But if you don’t mind the extra effort it makes a great crust! I can’t claim to have made a large survey of the world’s fish tacos, but on the occasions that I have had them I have quite enjoyed them. There is something about tacos and especially fish tacos that feels summery to me. Maybe it is the fresh toppings and the tang of limejuice or the fact that you eat them with your hands, but to me they are a perfect laid back Summer time meal.
As the weather started to warm here in DC, I found myself craving some fish tacos and wondering why I had never tried to make them myself. With that in mind I did a little research and came up with a recipe I wanted to use. I got my inspiration and the spice blend for the fish from Host the Toast. These are easy and fun to make and you could alter the toppings to your taste. I love the red cabbage on them, but lettuce would work as well. These photos show a avocado cilantro sauce, but I have since served them with guacamole, which I like better. Growing up Friday night was always pizza night. My mom used to make the dough and then we would all choose our toppings, which resulted in a lot of half this and half that pizzas. It was a tradition we kept going through my high school years when I was the only kid left at home. Since Andrey and I are staying with my mom for a bit we decided to resurrect the tradition. So, Friday nights are pizza nights again.
Homemade pizza is great because you can decide exactly what you want. From knowing that there are no preservatives in the dough to letting people choose their own toppings. We have come up with two pizzas that we all like a lot: the traditional, margarita and a more adventurous, white pizza with mushrooms, caramelized onions, and Gruyere. I came up with this dish because I wanted something light and filling, but was tired of my standard recipes. When working with black beans I often gravitate towards the obvious, Mexican inspired flavors. So, this time I decided to be a bit more adventurous. There was a butternut squash I had bought on a whim that had not found its place in the weekly menu yet. I don’t usually think of black beans and butternut squash as going together, but they both pair well with spices like cumin, coriander, and turmeric. After making the decision to use the squash the trick was how to bring in the raw salad element I wanted. A big bed of spinach sounded good, but my regular salad add-ins like pepper and tomato did not. That let to the idea of doing a creamy avocado dressing on the spinach and it ended up being the key to pulling the whole dish together.
This dish is pretty simple to make and most of the cook time is hands off making it ideal for a weeknight. For a healthy vegan dessert this pie is deceptively sweet and rich, which means that a whole week after Easter we still have half a pie left! This is not to suggest that it isn’t amazing, but it must be eaten in tiny portions (or you will regret it). I cannot claim this creative recipe as my own it is from Oh She Glows and you should check out her original post for its beautiful photos. This was my second time making the pie and I use her recipe with only one alteration: I leave out the ground flax because I think the taste is better without it. Chocolate Coconut Pie Vegan, grain-free, processed sugar free Ingredients: Crust: 1 ¼ c. pitted dates* 1 ¼ c. coconut 2 ½ tbs. raw cocoa 1 tbs. coconut oil ¼ tsp. salt Filling: 1 c. coconut milk (full fat) 300 g. chocolate 3-4 tbs. maple syrup/honey* 1 tsp. vanilla pinch of salt *soak ahead of time if they are firm. * depending on how sweet the chocolate you are using is. If you use an unsweetened baking chocolate you will need all 4 table spoons, but if you use a baking bar or chips that are semi-sweet then you will want less or none at all. Directions:
1. Toast the coconut. This is not essential, but it only takes 7-10 minutes at 350 and adds to the texture. 2. Line the 9-inch pie plate with saran-wrap. You absolutely want to do this. The second time I decided I would just grease the pie plate and I spent a long time carefully chiseling each piece of pie out. 3. A food processor is the best way to prepare the crust, but if you don’t have one it is possible to do it without one. If you are not using a food processor you should definitely soak the dates. If you have an emersion blender that can be used to pulverize the dates, this is what I did the first time I made it. 4. Start the crust by putting the dates either in a food processor or using an emersion blender or blender to pulverize them. 5. Then continue to add the ingredients to the dates in order until they are all combined. If you are using a food processor do they whole crust in it. If you used a blender or emersion blender I would mix the other ingredients in by hand. 6. Now the crust should be in a ball feeling sticky but pliable. Place the ball in the middle of the pie plate and begin flattening it out. Be careful to press the dough out evenly in all directions, so that you don’t end up with too much on one side. Set the crust aside. 7. To prepare the filling begin by melting the chocolate in a double broiler or over low heat with consistent stirring. Once it is smooth let it cool to room temperature. 8. Combine the melted chocolate and the coconut milk and whisk until smooth. 9. Whisk in the sweetener, vanilla, and salt. 10. Spoon the filling into the pie crust and carefully set it in the freezer to harden. There might be a bit more filling than fits into the crust. Both time I put the extra in a ramekin and froze it as well. I hope you guys enjoy this recipe as much as we have. Let me know if you make it and what you think of the results! |
About Me
My name is Kaarin and I am a ballet dancer, cooking enthusiast, health nerd, and sustainable lifestyle advocate. Archives
April 2015
Categories
All
|